Downloading Music For Dumb Idiots That Are Scared
Good Evening!
This is, in short, a little guide on how to download music and set it up for personal use. It's not the most professional set-up by far and will undoubtedly be written from the perspective of a casual music collector for others looking to join the hobby and aren't picky on audio quality.
Note that this guide in specific will require a PC.
This is pretty much motivated by there being a severe lack of actual guides to the process alongside my want to give others an easier time in written form. If you want more context on my why and all, it might be nice to check out my recent post regarding my relationship to music. This one will serve moreso as a rundown on how to get started building your local music collection, from the pre-planning to the actual act of listening to a good tune.
Choosing your means of listening
This one isn't exactly mandatory as a first step, but it's useful for the sake of deciding what metadata1 to tag.
Means of listening is a pretty broad term. Do you plan to listen to your collection through PC or phone? Maybe you want to buy a dedicated music player. Do you care about the pretty details of your song files? These are very one-and-done questions, but they serve as the backbone of the rest of your process. While you could very much use the default Windows Media Player and your phone's file browser, there's usually far better choices.
PC-Based Options
Note that I'm wildly biased towards Windows as that's what I use.
Phone-Based Options
Also note that I've never remotely added music to my phone, and all of this is very Android-skewed. Sorry to all iOS users.
Dedicated Music Players
These suckers tend to get pricey! It's possible to nab some off Aliexpress, but I'm jotting down quality ones that I see around. I'm sticking to linking one per brand so you can explore their sites and see what's good for you.
- Snowsky Echo Mini2 50-60 USD
- Hiby R4 250 USD
- Innioasis Y1 50 USD
Additional note: Headphones
If you want to get the most out of your funny MP3s, you'll want to get some decent earbuds/headphones the like. IEMs tend to be deemed the best of quality and portability, but I'm personally not one to care much for it right now. I literally use generic wireless earbuds and a pair of wired earbuds with a model number I cannot remember whatsoever. Go nuts.
Now that you've chosen your means of listening, it's time for your means of getting the actual music.
Downloading Music (Scary!)
You're going to be testing your ethics a little, but not to worry. This guide is moreso for beginners, so this won't be delving into scary stuff that kills you.
If you want to get your tunes through moral means? Bandcamp is the way to go. You support your favorite artists, you get access to their music in top notch quality, and it's far better than just streaming on Spotify. If you're not a big Bandcamp guy and want to give them your money? Buy their physical albums through official sources, or buy their merch if their physical albums aren't available.
If you can't go official but still want to go moral, second-hand will do. Vinyls are hip and popular enough to be in some mainstream retailers (i.e. Walmart) and I personally spot cassettes in practically every second-hand shop I go to. CDs are in a similar position, although I've had a harder time finding them in comparison to DVDs and VHS, which they tend to be mingled with. Of course, you will need to find a way to dump3 your new purchases, which will inevitably mean buying special equipment, which is entirely out of my scope and will cost you a hundred dollars at minimum.
For the morally dubious:
WATCH IT!
Before downloading your music from your streaming service of choice, I STRONGLY suggest you compile your music into one big playlist / multiple playlists / whatever as long as it's a playlist of sort. This will allow you to download in bulk and not worry about having to copy-paste each individual link one by one. Similarly, if you're downloading playlists, try to isolate them into folders within your local storage depending on whatever category you want. It'll be tedious, but it will save you great effort (especially if you manage to bundle metadata with your downloads).
yt-dlp4: Yes, you will be forced to deal with the terminal to use this one. It's mostly a matter of knowing what commands to use for what contexts, as it personally didn't take me very long for me to develop a few fundamental set of commands to get things done. Supports Youtube and Soundcloud at minimum, I'm personally unsure what else it supports since it just says it supports plenty. Hell, it works for damn near anything, download your damn Youtube videos for all I care. All I can say is that this is top-notch for Youtube and that proper command use will mean you get to save yourself a lot of work, especially in comparison to its many noob-friendly variants.
What, that's it? Where the hell's Spotify/Apple Music/etc?
Quite frankly, I'm not versed in the proper streaming services, especially not ones fueled with DRM. yt-dlp isn't inherently criminal unless you download copyrighted material using it, and it won't really give you issues. Hell, a lot of what I nabbed with yt-dlp was a ceaseless amount of shitposty remixes of Megalovania that I'm confident aren't copyrighted to any capacity. Apologies to you Spotify/Apple Music/etc folks, but chances do exist for you! Do your own research for this one!
Metadata Management
Here comes the scary part yet again! Unless you properly used your commands in yt-dlp, you'll have a ghoulish amount of work to do. You can do this right through your media player of choice (Musicbee's apparently good for this, but I did it through WACUP the first time and it was awful), but this guide will focus on MP3Tag as it's generally deemed the best of the best.
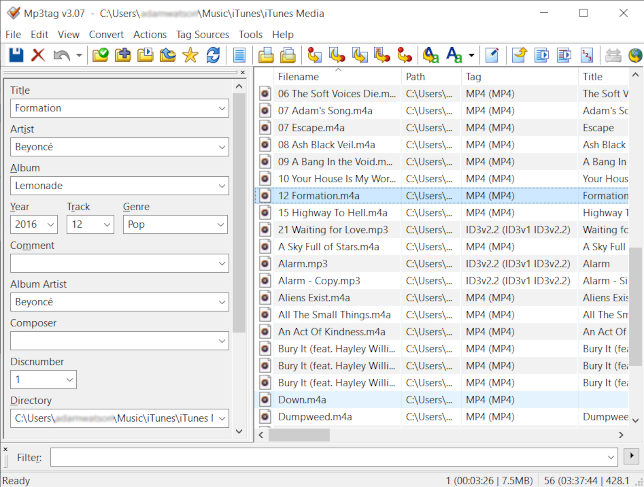
Welcome to MP3Tag! Most of what's going on in this image is self-explanatory. On the right will be all audio files within your selected directory (selected through File > Add Directory and File > Change Directory as you see fit). On the left is all the metadata for your selected file. It's up to you to add what you see fit, I personally add Title, Artist, Album, Year, Track, Genre, and Lyrics to my files.
The upside of MP3Tag is that it lets you edit files in bulk. This is where your clever command use and playlist organization kicks in. yt-dlp's --add-metadata and --embed-thumbnail will do plenty of the work in adding, at minimum, song titles, artists, and thumbnails. This could be enough for folks, but I personally prefer making things look nice and go out of my way to fill in the other data. Personally, I do it either manually or use the Genius Lyrics Plugin for MP3Tag, which both adds lyrics and helps me out with filling out plenty of the common data.
Tricks like this are what make a difference between spending a month tagging 300 songs and three days tagging 700 of them!
Similarly, check out that top bar. Hovering over the icons will generally tell you what each thing does. The area with the file folders is for messing with the directory, the zone with the red dots is for copying information between the file name and the metadata entries, and the Aa zone is for the actions menu! These vary widly, but I mostly use them to clean up file names in bulk using REPLACE and grabbing my information off Genius.
Depending on the amount of songs, variety in artists/albums/genres/etc, bundled metadata, your tools, and your want for accuracy, this is likely to stretch into long hours of working. I, ironically, suggest putting on some music for this and keeping a cup of water at your side. Generally, I did the tagging process in batches of hundreds that stretched through eight-hour sessions that spanned through one or two days. Remember to stand up regularly, take breaks, and get some water in your system while you're at it. I usually have WACUP playing music while I tag music to add into WACUP itself later.
It's a matter of getting into a flow state. Maybe do a small batch to test the waters, or do it all at once like I do! This is practically entirely up to you at this point, go nuts. Once you're done with this, you've made it.
The Victory Lap
Now it's time to add your music to your software of choice? For me, this means dragging it into WACUP's audio section before delegating it into the little playlists I built within the program. It also means loading the songs into the Mini and my USB then having to go back into them through MP3Tag directly in order to shrink their cover arts to 500x500 jpegs in bulk and sitting there for an hour at 2 in the morning. This is entirely reliant on your experience, really.
Once it's done, you're done!


Your music is all yours. Nobody can take it away from you now. Make sure to back it up to an external drive of some sorts, yeah? Just in case your data corrupts, it's better to be safe.
Have fun, and enjoy listening to your hard-earned music collection!
Kind regards,
ദ്ദി◝ ⩊ ◜.ᐟ

Metadata is data that explains other data. In this context it encompasses things like song titles, artists, albums, cover arts, or far more niche and hyperspecific tidbits.↩
I can attest to the Echo Mini being quite the picky machine. Update the firmware via connecting the device to your computer, and make sure that there's no microSD inside / back up your songs as the updates do tend to format whatever's inside the Mini. If you use a microSD for it, keep it at 256GB and below, and please format it twice THROUGH THE MINI ITSELF before adding anything to it. Thankfully, the Mini's microSD can be accessed via the USB-C port, as this device has the most godawful microSD port to ever exist. Great little music player though.↩
Dumping is a term that refers to creating a digital copy of a piece of media through a physical copy.↩
I'll likely also jot down a guide on yt-dlp's syntax to keep this post clean and make it easier to use. Sometimes it really is hard to find this information out there, you know?↩